No Bake Cake A Table Decoration You Can Eat!

Rating:
How To Make An Edible Table Decoration Cake:
Here's how to make gorgeous no bake edible and totally delicious table decoration cake!
You can make this cake yourself in around 10 minutes, but it is also a really fun activity for you to make with your kids as a craft activity! You can fill in an hour if you set up your kids at the dining table to create this edible masterpiece with you.
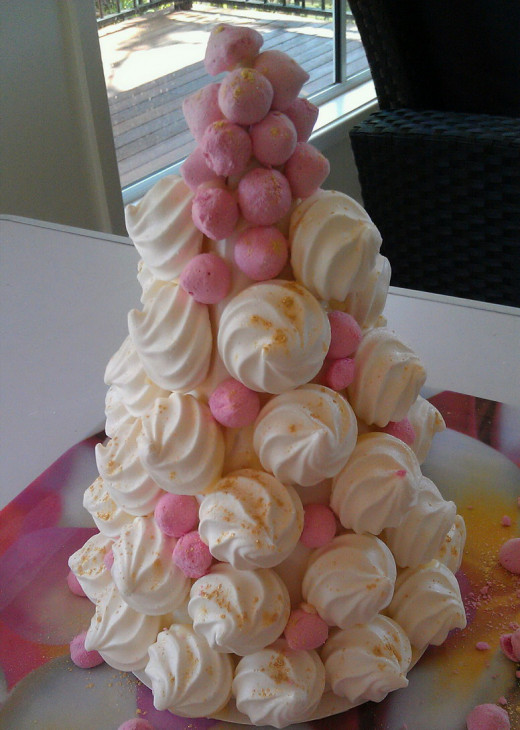
The photos of the table decoration dessert on this page were made by myself with the help of my 2 year old who had great fun making this 'cake!' And look at the beautiful results!
You can personalise this dessert with your favourite sweets, and due to it's shape, in addition to being a yummy treat it also makes a great Christmas and special occasion table decoration too!
You will also require:
- A half sheet of cardboard
- Sticky tape
- A plate (Or platter)
Ingredients:
- 2 bags of small meringues (Alternatively Chocolate Coated Marshmallows)
- 2 bags of lollies or sweets of your choice (For example: Jubes, Jelly Beans, Marshmallows)
- Melting Chocolate (Dark, light or white)
- Optional: Edible glitter.
Step 1:
The base of the dessert is not edible it is made with cardboard which has been stuck together with sticky tape on the inside. I made this beautiful dessert using a half sheet of cardboard purchased from my local art supply store. I found the cardboard with the shine finish (As opposed to matt finished cardboard, like used for school projects) best because it allows the 'cake' to be eaten without fear of any chocolate bonding to the paper. I found no such problem occurred when it was being eaten (Some of the melted chocolate remains on the card).
You could double the ingredients and make this dessert double the size by using more than half a sheet of cardboard.
To make the cone you simply turn the cardboard until it forms a cone shape and apply sticky tape to the inside join to keep it in shape. Similar to if you were making a 'Witches hat". You then trim the bottom of the cardboard so it sits flat on your plate or platter.
- Alternatively, you can make smaller 'Cakes' by using cardboard party hats as your base! That way you could prepare an individual dessert for each of your guests too!
Fill in any gaps with smaller sweets.

Step 2:
Melt around 1 half cup of melting chocolate. When it is of a toothpaste-like texture, pour it into a bowl.
- I used the microwave to melt my chocolate and just let it cool a little before I allowed my daughter, who was assisting me to, start working with it. I cooked it in a coffee cup and stirred it in 30 second intervals until I had the texture just right.
Step 3:
Dip your largest decorations (Meringue or Marshmallows) one by one into the chocolate, and starting at the base of the cardboard cone, hold it to the base for a few seconds until the chocolate grabs to the cardboard and keeps it in place. Repeat and continue to work your way around the cone until it's fully covered.
Step 4:
Dip your smaller sweets one by one into the chocolate and fill in any gaps on the cone.
Step 5:
Dust your cake with edible glitter!
If you are preparing a table decoration with a Christmas theme, you could dust with a little icing sugar to make the effect of snow on a Christmas tree!
Hints:
- If you want to put candles in this cake for a Birthday it's best to use candles which come on a long stick as they can then fit into the top of the cake together (Slide them through the tip of the cake). I don't recommend putting standard wax birthday candles on this dessert itself due to it's base being of cardboard. Alternatively, you could use 'floating candles' on the platter around this dessert.
- Store in a dry cool area, no need to refrigerate.
- To transport this table decoration to a party try using a bucket lined with a tea towel, as it's quite tall and bulky for transporting on a plate.
A Great Talking Point For All Parties!
While I enjoyed making this cake with my daughter for a Birthday party celebration, as pictured here. This dessert would look fabulous in Christmas colors as a Christmas tree table decoration or you could do a love-heart theme for a romantic theme. You could even use chocolates to replace the marshmallows and make a chocolate tree cake!
This is a gorgeous looking dessert which can be varied to suit your own personal celebration and will certainly be a talking point and brighten up the dinner table!
Of course, your guests will also enjoy picking off their favourite sweets and devouring this beautiful looking cake!
Author: AustralianNappies Copyright 2012
Photos: Copyright of Author
Also Try This Edible Fruit Platter Table Decoration:
- Edible Table Decoration Christmas Fruit Platter
Fun to make with kids, a Christmas table decoration, skewer fruit platter.


